Wednesday, June 27, 2012

WIP: Backyard Baby Boy Blocks

I started sewing my blocks together for my "Backyard Baby" quilt! I really do love this fabric-- I think it's adorable. I'm using Amanda Jean's Filmstrip quilt, although my blocks are a little bit bigger.


This print is my favorite! I love the little jars.

This is the first time I've worked with directional fabric, and that's been interesting. It meant I had to do some very careful planning for how I was cutting out pieces (I drew it out on a piece of graph paper so I didn't get confused-- I think I ended up with about six square inches of scrap of each of my prints, so I cut it very, very close with my quarter yards!) It also means I have to pay attention when sewing, or this happens:

Oops.

Nevertheless, the blocks are going well and quickly. It's a super-simple quilt to chain piece, and a pattern I'll likely use again.

Unrelated to sewing, but I had to cross an old stone bridge and walk past this on my way to campus yesterday. Pretty terrible, huh? :)


 Linking up with Freshly Pieced. Happy Wednesday!


Pin It

Monday, June 25, 2012

Tropical Table Runner

Finished Table Runner and Machine Binding Maiden Voyage

I finished up my sister-in-law's birthday present, and I'm really happy with how it turned out! She loves all things tropical, and I hope I've captured that here. I used Amy's easy table runner tutorial, which is, as the name implies, very easy.


As I mentioned when I bought the fabrics, I'm not a huge batik person. But I really love the backing fabric I chose. I might even like the back more than I like the front!


My strips are (somewhat) randomly sized: I used 1.5", 2", and 2.5" strips and just cut a few of each size out of each fabric. This is a quilt-as-you-go project, so the lines on the back of the runner aren't evenly spaced (they could be though, if you chose to use strips of the same size). I added some additional quilting, just eyeballing it every inch or so. So some strips on the front ended up with two or three quilting lines, and some only one. You can see how it looks on the back too.


Always remember to photograph quilting projects in their natural habitat.

This was also my first attempt at machine binding. It was nice to try that on a smaller quilt to see how I liked it. However, it didn't go perfectly:

Some puckering! Some unevenness! Oh my!

So here's what I learned about machine binding (I used Amy's tutorial for that too).

1. I HATE invisible thread. I didn't know where the stitching would end up on the backside, so I got some invisible thread to use in the bobbin. That... didn't work. At all. I couldn't even get the bobbin to wind. I don't know if it was the kind of thread I got, or my old machine, or just something I did wrong, but it was a disaster. It just kept breaking when I tried to wind it. So I cut my losses and decided to just use white thread. It does show--quite a bit--but I decided to just consider it "bonus quilting."

Has anyone had any success with invisible thread, or is it just not worth the hassle?

2. The binding ends up being very uneven (skinny on the back and wide on the front). This could be solved by not pulling it so tightly around from the back, and in the future, I would probably do that, because I'd like just a little more binding on the back than I ended up with. The nice thing about the unevenness is that I knew I wasn't going to have stitches showing up in my binding on the backside. The downside then, is that the stitching on the back is pretty far away from the binding on the back. (You can see that in close-up of the back, above.)

3. I will probably continue to hand bind my more meaningful quilts (baby quilts, wedding quilts, etc.) I just like the look better. However, this is a great technique to have in my back pocket, and I'd never hesitate to use it for a wall hanging, table runner, or other small project. It's even good to have on hand if I'm ever short on time for a "meaningful" quilt-- this is certainly MUCH faster than hand binding!

So, a cute birthday gift for my sister-in-law and a good learning experience with a new technique for me. I hope she likes it!

Linked up at Canoe Ridge Sew Modern Monday and Plum & June's Get Acquainted Link Up.

Jam Session

On Saturday, I spent the afternoon (too gorgeous to be inside, I regret to say! But so it goes.) making this:

Heavenly!

...into this:

One batch strawberry, one batch triple berry.

You really haven't lived until you've undertaken a canning project in an apartment kitchen.


The blood of many berries was shed.

Thankfully, I had great help:


This thing really is great though. If you are ever making jam or eat a lot of strawberries, it is well worth the money. There are cheaper ones out there, and I used to have one before my mom got me this one, and they do not work. This one, however, does. It takes out only the minimum of the actual fruit, it's easy to dispose of the top once you cut it out, and in short, it's just a great tool. I happened to see that it's featured in Cook's Illustrated this month too, and they say it's great for tomatoes as well. But I hate tomatoes, so I wouldn't know. :)


Now Playing


We're always looking for ways to freshen up our playlists, right? I've decided to feature a few songs from time to time, just for fun.* :) I was feeling pretty uptempo today.

1. Origins-- Tennis
2. MoneyGrabber-- Fitz and the Tantrums
3. New in Town-- Little Boots

*Note: I am really not a lyrics person, and enjoy songs even without knowing what they're saying (sometimes more when I don't!) As a result, some of these may have questionable thematic content. Listen at your own risk.

Pin It

Sunday, June 24, 2012

Glassy Eyed

This afternoon, I decided to go to the Corning Museum of Glass. It's a very enjoyable, well-done museum-- a little art, a little science, and a little history. I'm always so drawn to glass art. I love the way that it can look so incredibly different in all of its different applications. The colors, the shapes, the shiny-ness (or lack thereof), the transparency or opacity-- it's just an incredible medium. Maybe I'd try working with that, but it seems a little bit harder to get into than fabric does.

But let's enjoy some incredible colors and patterns, shall we?

Here we have a variety of lovely snuff bottles. I loved how they all looked on the shelf! (By the way, what a gross habit-- people used to carry around these little bottles or boxes filled with dry tobacco powder and snort it. I'll bet that was attractive.) 


How's this for precision? Clearly, this guy had an eye for extremely minute detail. Besides the obvious amazingness of the inset mosaics, he upped the awesomeness by using over 200 types of ancient glass that he melted down, remade into flat pieces, and shaped.

Mosaic Glass Tabletop, Giovanni Rossignani, Italy, c. 1866


Look at those tiny, precise pieces!

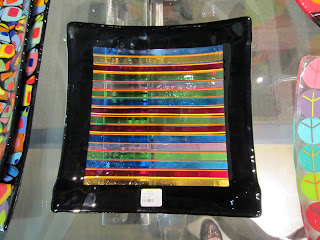
Other things I just enjoyed because I got some good ideas for color combos (I like this coral and seafoam combo), or I appreciated their lines (boyfriend dubbed the black and aqua one "space vase"). Some I just thought looked like a lot of quilts I've seen floating around the internet, like the plates for sale in the gift shop (pictured last).


This piece is so impressive in person. Every time I see it I try to get a representative picture, and I always fail. "No touch" glass in front of it doesn't help.


And finally, I just had to include this one, as it's one of my favorite pieces in the museum. It's a chess set pitting Catholics vs. Jews. I didn't get a good picture of the Catholic side, but the pieces all have this much character!


I hope everyone had a great weekend--mine was excellent. And I'll have a new finish to show off tomorrow--yay!

Pin It

Thursday, June 21, 2012

Reunited and it feels so good!

I'm back in New York! I'm so excited to have my rotary cutter and mat again. It was nice to do a few different projects and see that yes, Virginia, you can complete sewing projects with just scissors like generations before you... but boy is that little cutter handy!

Anyway, I'll be cutting lots of stuff over the next few days. I made a sewing "To Do" list today. It's strange--only a couple of months ago, I couldn't imagine ever having more than one project going at once and found it sort of amazing that people would talk of their double digit WIP piles... but I think I'm starting to get it.

So, soon I will have some pictures of actual projects, including *gasp* some quilts! Amazing, I know. But for now, I'll feature some of the various fabrics I picked up while I was away. I found a couple of fun stores in Grand Rapids (sightseeing fabric-geek style). Some are for specific projects, but most are just things I like. I know, the most dangerous kind of fabric shopping.

L to R: "Dress Up Days" (Riley Blake), "Stockholm" (Robert Kaufman), unknown blue stripe, "Happier" (Riley Blake), ditto, "Spring Fever" (Hoffman Fabrics), unknown green stripe, and "Architectural" (Free Spirit).

The green birds and pink stripe probably look familiar from the little bag I made a couple of weeks ago. They were just too cute, so I got a little more. I'm 27, so it's always baby season and I'm sure I'll have plenty of opportunities to use them. I'm especially excited about the gray hexagons, a last minute addition to my friend's wedding quilt (more on that next week). Imagine my happiness when I got home and found her RSVP also featured gray hexagons! Too perfect.


I spent most of today settling back in. I also found out that I got a new office! For the past three years, I've had a basement office with no windows (has anyone seen my stapler?) But I've been promoted all the way down the hall, to an office with not one, but TWO windows! Oddly, it's also about 10 degrees cooler than my old office, which is great, since the building is 140 years old and has no air conditioning. Best of all, my office mate, who is awesome, is moving too. We never get any work done when we are there at the same time. Oh well. :)

Here is a selection of things I found in my new office:

A bossy chair.

A paint-by-number poster that was the result of a favorite department drinking game.

And my personal favorite, an "Insect Cage Gallery," complete with lights, sound effects, and "real action," whatever that means. 

Yes, it's pretty safe to say that I am definitely moving on up.

All in all, it's great to be back. I love this town in the summer, and I'm just in time for a big cool down (yay!) There will probably be some envy-inducing photos on this blog in the coming weeks, because I live in a pretty gorgeous place. :) Happy as I am to be back, I'm going to miss this guy though:


Who wouldn't?

Pin It

Wednesday, June 13, 2012

WIP-py Skippy!

Corniest title ever (self-anointed).

Anyway, I've got a couple of things in the works today.

Margaret's Hope Chest Blocks

First, a bunch of blocks for Margaret's Hope Chest. I've wanted to help out with this group ever since I read about it, because they do really fantastic things, but when I read about this call for blocks on Crazy Mom Quilts, I figured I could do some of those quite quickly! I'm actually in Grand Rapids until next week, so I'm motivated to get them done before I leave!

The orange ones are my favorite.

Here was the problem: I'm away from my rotary cutter, mat, stash, and pretty much everything helpful in quilt making besides my sewing machine. I decided to take advantage of JoAnn's fabric sale right now and pick up some fat quarters for $.99 each. For nine fat quarters, I got 18 blocks! Not bad for under $10. And since the edges fray a bit when washed, the fact that my cutting is less precise than usual shouldn't be a huge problem.


Anyway, it's a fun, quick project! Please consider helping them out!

We all help in our own way.

Tropical Table Runner

Second, I bought some fabric for a table runner I'm making for my sister-in-law's birthday in early July. I'll make an admission: batiks are totally not my thing. At all. I love the colors, but it just reminds me way too much of tie-dye. And I don't think they go very well with prints, so the few that strike my fancy just seem impractical to me. However, my sister-in-law loves all things tropical, and batiks really fit the bill there. So, with much deliberation, I came up with this collection. I actually kind of like it! Hopefully she will too.


A Fail Tale

And finally... get ready for a big, fat fail! Maybe no one likes reading about failures, but if you enjoy a little schadenfreude, get a load of this.

It all started with a desire to make my boyfriend a little something with fabric from his alma mater, Michigan State, since I'm actually in Michigan and able to easily get my hands on it. (I am a fan of a better, redder team).  I decided that an oven mitt would be the perfect quick and easy project (mistake #1). I found a tutorial online and embarked on making my wonderful surprise.

When I bought my insulated batting, the woman told me that she didn't think a single layer was enough when she had made potholders before. Of course, I didn't want my boyfriend to burn his hands with my delightful gift, so I decided to double the layers of insulbrite. This probably would not be a big problem with a regular square potholder. With a mitt, however, adjustments for the increased thickness should have been made, adjustments I did not make (mistake #2).

The tutorial recommended quilting a rectangle before cutting out the pattern, which is an excellent idea. Here is how amazing my quilting is:


But the back was even better:


Apparently, I forgot everything I ever knew about quilting, like "use lots of pins to keep your layers together so they don't bunch up like this, stupid." Oops. (Mistake #3) I forged ahead anyway because it was just the inside, and who really cares, right?

I used masking tape to mark my quilting lines, but they still ended up rather wonky because 1) I was in a hurry, 2) I don't have a walking foot on this machine, and 3) the layers were about an inch thick. But pay close attention to my layering here. Do you notice a problem?


I didn't. Not until I started sewing and realized I had my pattern under the tape and pins and would have to quilt through it (mistake #4). (Mind you, this was after I had quilted a couple of lines.) So I unpinned, re-taped, and forged onward. I'm considering this my introduction to paper piecing, without the piecing.

Sewing it together went about as well as you would imagine at this point. I turned it inside out, and this happened (mistake #5):


After reinforcing the seams, I turned it all the way out again. Or, I tried. Unfortunately, since I don't have access to a printer at the moment, I had used an existing oven mitt for the pattern instead of the tutorial one. As I didn't allow for seam allowances (mistake #6) and because there was increased bulk, I could not get the thumb to turn out. After finally trimming it, I got it most of the way turned out. As you might expect, the whole mitt is a little bit small:

Look how it appears to be floating in mid-air. That's because my skin almost matches the pale beige walls. Awesome.

I am going to tell him that I made him half a pair of mittens.

So... needless to say, this oven mitt was not my finest hour. I think I have enough supplies left over to make him just a plain square potholder. Maybe I'll be able to handle that one. :)

Linked at Freshly Pieced WIP Wednesday.

Pin It

Friday, June 8, 2012

Bunches of Bags!

Well, the purse-making frenzy has finished for the week. In reality, the frenzy was really just yesterday afternoon and this morning, but we're all entitled to a little dramatic license. Let's survey the fruits of this labor, shall we?

First up, after finishing my first Margaret bag as a gift for a friend earlier this week, I decided that I needed one for myself too. When I wore a gray dress yesterday and found I had only packed a single purse and it was brown, my need for this purse became desperate. So, I stitched it up yesterday afternoon! Having already completed it once, this went much more quickly (it took me about three and a half or four hours.) I used some aqua fabric from Bonnie & Camille's "Vintage Modern" line.

Can we all admire how perfect that button is for a moment? Maybe this isn't the best photo of it, but trust me, it's perfect.

After finishing the first Margaret bag, I was a little annoyed with the time and expense that resulted from the many layers of interlining. So this time, I tried it with just a single layer of heavy weight interfacing. I'm happy with how it turned out, but you can see here the difference in how stiff the finished bag is.

No, I haven't mailed the gift bag yet. I'm working on it. :)

The second purse I made was something I was inspired to try by Amy's Fat Quarter Bag. But really, the only thing I did that was similar was use fat quarters as my starting point and use grosgrain ribbon for the handles. Amazingly, I managed to make it reversible with no major issues on my first go-round. It took me about an hour and a half start to finish.

Side one!

Side two!

Pretty cute, I think! Maybe someday there will be some little girls in my life to make these for.

Update: I found a home for this little bag! We went and visited my boyfriend's family this weekend and we gave the purse to his five-year-old niece. Perfect! He (boyfriend) has been so sweet about the purse-making enterprise, by the way. He keeps showing off my aqua bag to people and telling them that I made it. :)

All in all, I've enjoyed this little foray into purse making!


Linking my bags with Amy Lou Who's Sew & Tell.

Pin It